


Key Takeaways
- Quick maintenance can drastically improve your ride.
- Innovative solutions exist for unexpected repairs.
- Expert advice enhances efficiency and enjoyment.
Cycling can be a breeze or a battle; it's all in the know-how.
Have you ever found yourself spending more time fixing your bike post-ride than you did enjoying the journey?
Let's change that narrative today.
Ever wonder how some cyclists make it look so easy?
Knowing a handful of cycling hacks can transform your ride from grueling to graceful.
You want advice you can trust, and as a fellow cyclist who has clocked countless miles and encountered just as many roadside challenges, I've got the insider knowledge.
From makeshift mudguards to sneaky storage solutions, these tips will have you pedaling more efficiently and with a grin to boot.
So, arm yourself with these clever tricks to tackle common cycling snags and turn every ride into a smoother adventure.
Use a Pool Noodle for Safe Passing

Hey, have you ever felt a bit too cozy with cars zooming by while you're on your bike?
Let's talk about a colorful way to claim your space on the road!
It's as simple as heading to your local store and grabbing a pool noodle.
Yup, that's right, a pool noodle!
What's the big idea?
Strap that noodle to your bike so it sticks out to the side.
It's not only a bright banner fluttering in the breeze but also a handy tool that says "Hey, please give me 3 feet of clearance!"
Why use a pool noodle?
- Visibility: That splash of color makes you hard to miss.
- Safety Buffer: Drivers can better gauge a safe distance.
- Advocacy: It's a conversation starter about cyclist safety.
Here's how you do it:
- Pick a noodle – fun colors welcome!
- Use a bungee cord or strong tape.
- Make sure it sticks out a couple of feet to your left.
- Enjoy your ride with a new peace of mind.
It's not just for show; it works.
One cyclist, Warren Huska, started rocking the noodle in 2015 and noticed drivers giving him a wider berth.
This cheap hack has caught on because it's effective at preventing those all-too-common close calls.
So next time you're getting ready for a ride, grab that noodle and strap it on.
It's a statement piece that could save your life and make drivers think twice.
Stay safe and stylish out there!
DIY Chain Cleaner

Ever been on a ride and realized your chain is more grit than gear?
No stress, let's get that chain spinning smooth without breaking the bank!
Grab a plastic bottle, cut it in half, and you've got yourself a nifty DIY chain cleaner.
Here's your step-by-step guide:
- Find a Plastic Bottle: Any old soda bottle will do. Give it a good rinse!
- Cut It in Half: Safety first! Carefully snip it so you end up with two bowls.
- Whip Up Some Degreaser: Fill your new 'bowl' with a degreaser. Eco-friendly choices are out there!
- Get to Cleaning: Place the chain in the degreaser, hold it steady, and let's backpedal. Your chain will roll through the solution.
- Rinse Off the Gunk: Once the chain looks spick and span, give it a water rinse.
- Dry and Lube: Dry off the moisture and apply chain lube—one drop per roller should do it.
Don't forget to wipe off the extra lube with a clean rag.
Trust me, you'll keep the dirt magnet away and your chain will thank you with a smooth ride.
Remember to recycle that bottle when you're done!
How's that for a clean bike and a cleaner planet?
Keep your ride green and keen, my friends!
Tire Boot with a Dollar Bill
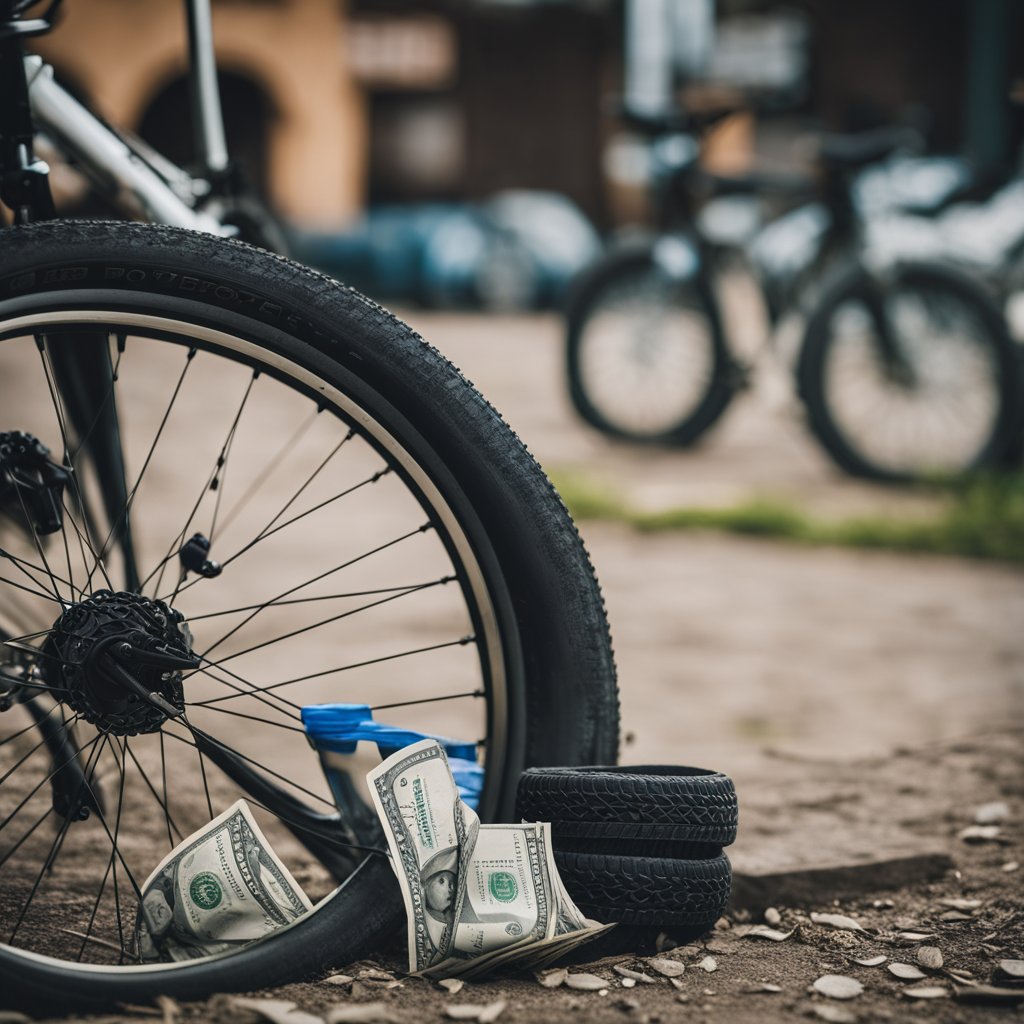
Have you ever been miles from anywhere and heard that dreaded 'pfft' of a tire giving way?
Don't let a tear in your tire cut your ride short.
A simple dollar bill can turn into your best friend on the road.
Here's a nifty little hack that could get you back on the saddle in no time.
Step 1: Finish your energy gel and hang onto that empty wrapper, or take out that lucky dollar bill you've been saving.
It's about to come in handy.
Step 2: Carefully remove the wheel and extract the punctured tube.
Let's not make the hole any bigger, shall we?
-
Step 3: Inspect the Tire
-
Look inside the tire for the tear. Make sure you remove any nasties that caused the puncture. No one wants a repeat performance.
-
Step 4: Position Your Makeshift Boot
-
Fold your dollar bill or gel wrapper tight and flat. We're making a DIY tire boot, folks.
-
Place it inside the tire directly over the tear. This is your barrier; think of it as an 'inner-tire shield'.
Step 5: Slip the tube back into place, and carefully fit the tire back onto the wheel.
Make sure everything sits nice and snug.
Step 6: Pump it up!
Inflate your tire cautiously and listen for any air betrayals.
If all sounds good, you're ready to roll again!
Remember, your dollar bill tire boot isn't a permanent fix and it can't work miracles on massive gashes.
But it's a darn good trick to keep you on the move until you can give your tire the TLC it deserves.
It's a lifesaver when you're in a pinch – both for your tire and your wallet!
Zip Ties for Emergency Repairs

Ever found yourself in a bit of a pickle mid-ride?
Maybe your bike light decided to go rogue, or your chain is having a bit of a moment.
Don't sweat it!
Zip ties are like the Swiss Army Knife of cycling hacks.
Think about it, have you ever noticed how sometimes the simplest things can be absolute lifesavers?
Picture this: you're cruising along, and suddenly, snap—there goes your bike light.
No need to call it quits.
Grab a zip tie, loop it through, and fasten that light back in place.
It's as easy as pie!
Or imagine your seat post clamp decides to take an unexpected leave of absence.
A few zip ties snugged around can work as a makeshift fix until you're back home.
Just remember not to stress it with your full weight!
But wait—there's more.
Zip ties can even come to the rescue if your freewheel's feeling a bit under the weather.
If you're careful, you can use them to keep the cassette joined to the spokes.
It's not a permanent fix but perfect for those "get me home" scenarios.
And let's not skip chains.
We all dread a broken chain, right?
While not mentioned as a zip tie solution, carrying a quick-link can be handy alongside your zip ties for a straightforward chain fix.
It's a dynamic duo that'll save the day!
So next time you head out, toss a few zip ties in with your gear.
They weigh next to nothing but could literally hold your ride together.
You'll thank yourself later—and hey, if you ever use a zip tie to save the day, why not share your story?
Sharing is caring, after all!
Baby Wipes for Quick Cleanups

Hey there, savvy cyclist!
Ever found yourself miles from anywhere with grease-smeared hands or a bike that’s rather grubby?
Well, here’s a neat trick: baby wipes.
Yeah, those gentle, pre-soaped sheets aren't just for babies—they're a cycle-tourer's Swiss army knife for cleanliness.
Why lug around a water bottle and soap when these little lifesavers can tackle most on-the-road messes with aplomb?
And when you've got no shower in sight, they become even more of a blessing.
Picture it: you’ve just conquered a grueling trail, you're feeling victorious but, let's face it, also quite grimy.
Whip out a baby wipe, and ta-da!
Refreshed in a jiffy.
- Hands - Goodbye grease, farewell dirt! You know what I mean; those chain marks don't belong on your palms.
- Bike - A quick once-over and your trusty steed shines again. It's not just about looking good—it's about caring for your gear.
- Clothes - Caught a splash? A baby wipe dab will save the day.
Here's a quick list to justify tucking them beside your tire levers:
- Inexpensive
- Travel-friendly
- No extra water needed
Remember, though, we love our great outdoors, so always dispose of wipes responsibly.
Keep your adventures clean, friends – literally – and keep rolling smoothly with your new best pals, baby wipes!
Use a Floor Pump with a Gauge

Ever had that not-so-great feeling when your ride feels sluggish, and you realize your tires are underinflated?
Let's avoid that.
Your best buddy in this scenario is a trusty floor pump with a gauge.
Why?
Because keeping those tires at the perfect pressure is key to a smooth ride—and a gauge helps you nail that sweet spot, every single time!
Here's your quick how-to:
- Find your tire's recommended PSI (that's Pounds per Square Inch in case you're wondering). This is usually written on the sidewall of the tire.
- Attach the pump head to your tire's valve. Got a Presta valve? Make sure you've unscrewed the little cap on top before you press the nozzle on. Schrader valve? Just press the pump head straight on. Hear that hiss? Don't sweat, that's just the sign it's sealed properly.
Now, pump it up:
- Stand over the pump.
- Use smooth, full strokes.
- Keep your eyes on the gauge.
And here's a tip: When you've hit the recommended PSI—which the gauge will proudly display—give it one more pump for good luck.
It won't hurt and it's oddly satisfying.
Remember:
- Correctly inflated = happy riding. Your tires will last longer, and you'll fend off those pesky flats.
- Check pressure regularly, even if they look fine. Tires can be sneaky, slowly losing air without looking deflated.
Now, wasn't that easy?
Keep that tire pressure in check with your gauge-equipped floor pump, and you're in for a rollercoaster-free, efficient ride.
Happy cycling! 🚴♂️💨
Talcum Powder for Easier Tire Installation

Ever wrestled with a bike tire and ended up with pinched fingers—or worse, a pinched tube?
Well, guess what?
Talcum powder can be your new best friend on your tire-installation adventures!
Here's the scoop: a light dusting of talcum powder inside your tire can really help.
Why?
It's all about reducing that pesky friction.
The Benefits:
- Easier Installation: The powder acts as a lubricant, meaning less elbow grease for you.
- Less Risk of Damage: It minimizes the chances of your inner tube getting caught and tearing.
- Quick Tube Removal: If punctures happen, a powdered tube slips out more easily for repairs.
The How-To:
- Sprinkle a bit of talcum powder onto the inside of your tire. A little goes a long way!
- Spread it around evenly. Rotate the tire in your hands to cover all the surfaces.
- Insert your slightly inflated tube. This hint of air gives the tube some shape, making it easier to handle.
- Work the tire onto the rim, taking care not to pinch the tube. No more wrestling!
You may have heard mixed things about this hack—some riders swear by it, others skip it.
But anecdotes and a few tests hint that while talcum powder might not reduce rolling resistance, it sure can make maintenance a bit less of a hassle.
Remember, patience is key!
Take your time to get the tire seated correctly, and you're golden.
Next time you're prepping your bike, why not give it a try?
Your tubes might just thank you!
Saddle Height Marking

Have you ever repositioned your saddle, then scratched your head trying to remember the perfect height?
Fret not, marking your saddle height is a cinch, and once you do it, you can say goodbye to the guesswork!
First off, you'll need to ascertain your optimal saddle height.
Ever heard of the LeMond Method?
It's as simple as snagging a hardcover book and a measuring tape.
Here's the scoop:
- Stand up straight against a wall, sans shoes to keep it accurate.
- Wedge that book like you mean it (right up as if it's a saddle).
- Scribble a mark on the wall at the book's tallest point.
- Then, measure from this mark down to the floor—voila, that's your inseam.
Now, grab that inseam measurement and do a quick calculation: multiply by 0.883.
That number you get?
That's your magic saddle height from the center of the bottom bracket to the top of the saddle.
Neat, huh?
With your ideal height figured out, it's time to lock it in:
- Adjust your saddle to align with the number you crunched.
- Take a piece of tape or, if you're feeling bold, a permanent marker, and make a small mark on the seat post right where it meets the frame.
There you go!
Now, should your saddle ever slip or you need to remove it for transport, you've got a trusty indicator to get you right back to comfortable cruising altitude in no time.
No fuss, no muss, just smooth riding.
Keep rolling, my friend!
Chainring Tattoo Prevention

Ever glanced down at your leg after a ride and noticed a greasy imprint?
That, my friend, is the notorious 'chainring tattoo.' It's the badge of honor you never wanted, right?
Let's tackle how to keep your calves as clean as your riding style.
First off, have you heard of a chain guard?
This handy accessory acts like a shield, keeping your pants or skin away from the bike chain.
It's a simple fix that can save your look.
If you're not into adding extra gear to your bike, being mindful of how you dismount can make a huge difference.
Now, picture this: you're hopping off your bike, and boom, there's that pesky chain again, waiting to leave its mark.
To dodge this, just give your bike a bit of space as you dismount.
Keep your leg away from the chainring—it's like avoiding that one annoying puddle that always splashes up water.
What if you've forgotten all of the above and the damage is done?
Carrying wipes and a bit of oil – olive or baby oil work wonders – can help you erase that greasy stamp.
Just a quick rub, and it's like it never happened.
- Use a chain guard
- Be cautious when dismounting
- Carry wipes and oil for quick clean-ups
So, there you have it!
Keep your rides clean and your legs cleaner.
Remember, the only mark your bike should leave is the impression of how awesome you are on the trails.
Happy cycling!
DIY Mudguard with a Plastic Bottle

Ever found yourself with a stripe of mud on your back after a rainy day ride?
Say goodbye to that unsightly "racing stripe" with a simple DIY hack that's both eco-friendly and effective!
What You'll Need:
- A sturdy plastic bottle (think soda or detergent bottle)
- Sharp scissors or a craft knife
- Zip ties
Steps:
- Template Time: Begin by printing a mudguard template that fits your wheel size. A4 paper works great for this.
- Cut Out: Take your plastic bottle and cut it open along the length, opposite the label. Make sure you've got enough width to cover your bike's tire.
- Shape It: Use your template to trace the mudguard shape onto the bottle. With your scissors or knife, carefully cut out the mudguard.
Now for the fun part – attaching it to your bike!
- Front Mudguard: Secure one end to the front fork of your bike with zip ties, making sure it doesn't rub against the tire.
- Rear Mudguard: Fix the other end to the seat stay or directly under the saddle for a rear guard.
Don't be afraid to add a personal touch!
You can decorate your new mudguard with stickers or colorful markers.
After all, who said practical can't be stylish?
And just like that, you've got yourself a no-cost solution that keeps you and your bike clean and dry.
No more mud baths for you, unless you're into that sort of thing—no judgment here!
Happy cycling!


.avif)
